Guitar chord diagrams are very important in learning how to play the guitar. Once you know how to read basic guitar chords, you’re on the road to learning all kinds of chord-based music. Just like reading piano chord diagrams, there are special ways to learn how to read guitar diagrams.
Reading chord diagrams basic rules

Consider these important points in reading a guitar chord diagram:
- Vertical lines = guitar strings
- Horizontal lines = frets
- Black dots are where the fingers are placed
- Numbers will tell you which finger will be used
- Symbols like O and X tells you to play and not to play a string respectively
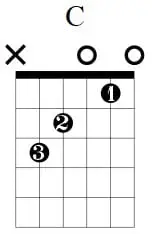
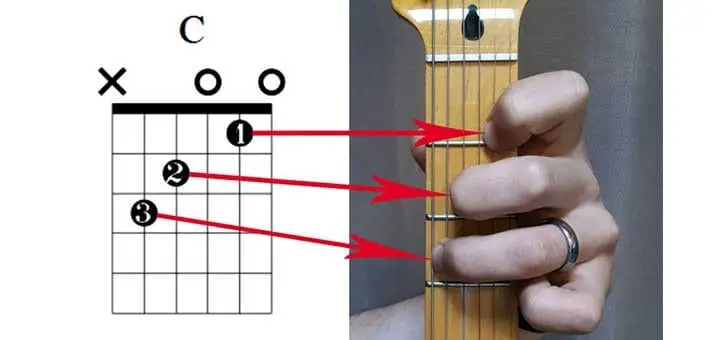
Let’s use this image to understand the different points better. So, the first point refers to the vertical line; these are the strings found on your guitar. Looking at your guitar, the farthest left line is the thickest string or the Low E. The farthest line is the thinnest ring or the High E. Therefore, reading a guitar chord diagram is looking at your guitar from its side.
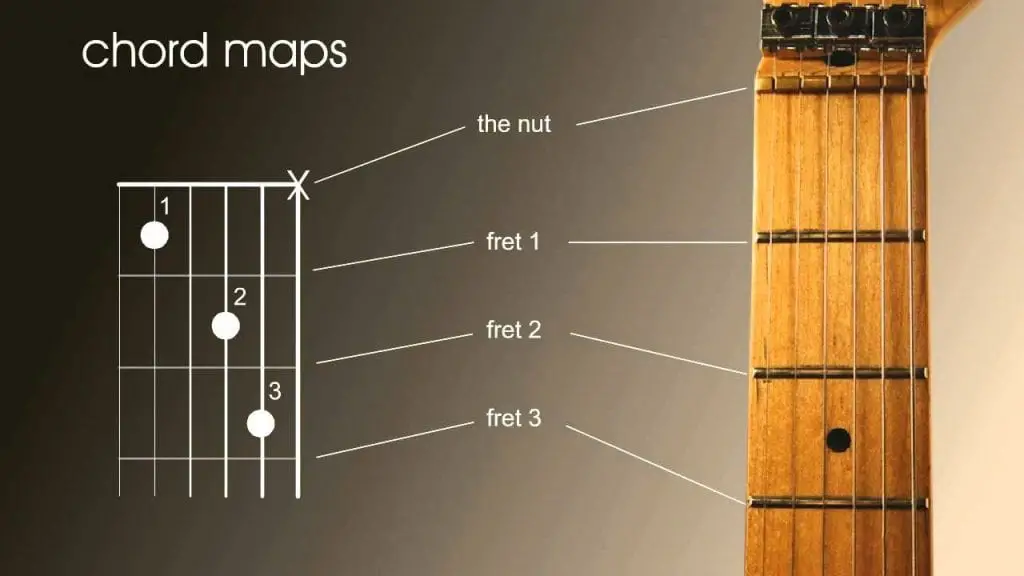
Looking at the horizontal lines on the diagram, these lines are the frets found in your guitar. The thickest line at the top represents the guitar nut. The frets follow the lines in a diagram. The vertical lines in the chord are the six strings.
Meanwhile, the black dots represent the finger placement. The black dots may be numbered or labeled, but sometimes these are simply dots. The first dot is located on the first fret on top of the second string or B. The second dot is found on the second fret over the fourth string or D. The third dot is placed on the third fret over the fifth string or A.
The diagram tells you that you must use fingers used to play the chord. And to find out what finger is used to play the chord, the number on the dots symbolizes the different fingers.
Sometimes the black dots are numbered while sometimes the numbers may be placed at the bottom of the chord. If a diagram has numbers, then follow these to find the correct finger placement. If the numbers are shown, then these will help you find the correct finger placement. But if the numbers are not shown, you need to find out what fingers work best.
Generally, 1 refers to the index finger, 2 is the middle finger, 3 is for the ring finger, 4 is for the smallest finger or pinkie, and a capital T refers to the thumb.
Once you have memorized the number designation of each finger, you can easily match your fingers to any guitar diagram. The T for the thumb is rarely used, and thus, you won’t be able to see these in any guitar chord.
Special chord diagrams for left-handed guitar players?
The next question you may have in mind is how left-handed players do it? Yes, there are some chord diagrams for left-handed people, but most guitar teachers recommend not using them because these are never really used in real performances. You won’t find any left-handed diagrams in music stores, schools, and private tutoring classes.
Some guitar teachers force left-handed students to learn right-handed chord diagrams. They believe that after learning how right-handed chords work, they can mentally turn the chords over in their heads and play left-handedly.
Most students who practice flipping the diagrams in their heads can quickly perfect this skill and are never bothered by reading right-handed chords.
About the O and X
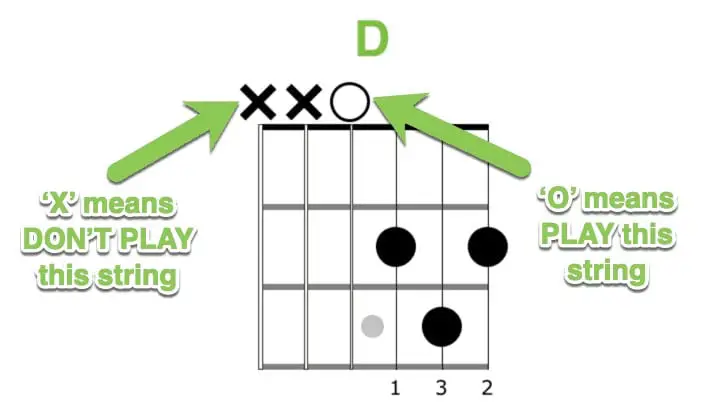
After you have practiced placing the right finger on the correct string, it’s time to get to know the Os and Xs. When an O is above the vertical line, you should play the string. If there is an X on top of the line, then you must not play this string. If you don’t find an O or X, a dot may be on top, and this means that you must play the string.
Playing the string or strings mean that you need to strum them. Skipping the string means that you don’t include the string when strumming. Some chord diagrams will require you to strum all strings, but some may only ask you to strum four strings. You must always look at which string to strum and which ones you should skip or else the sound will turn out wrong.
Some tips when reading chord diagrams
- Take it one dot at a time
Don’t rush; take your time. Learn each chord to the dot. You may find it difficult to move through the chords, especially if you’re doing this for the first time, but don’t worry. Just take it one dot at a time. Remember that any misplaced finger can lead to an incorrect tune.
- Check your hand position and practice strumming
After finding the correct placement of your fingers, practice strumming each chord. If you are unsure about the tune, listen to sample chords online. Play the chord again and again until you match the tone online. Strum the correct number of strings.
- Have a guitar chord diagram with you always
Whether you’re at home, at school, in practice, or anywhere, make sure that you have a complete chord diagram with you. You can use a handy diagram, something that can fit your pockets or use a digital copy and save in your phone. With constant practice, you’ll be able to play without the use of any diagram at all.
Barre chord diagrams
A barre chord is a chord found higher up on the neck. These chords use the same guitar chord diagram, but you need to check out two things before you play a barre chord.
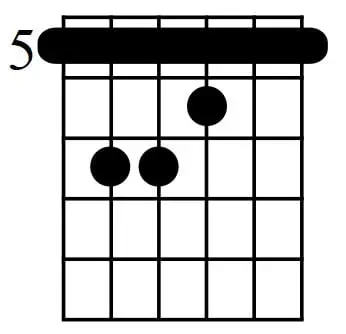
Looking at a barre chord, two things are different from regular chord diagrams. The first one is a very thick black line that covers an entire fret. The line covers all the six strings. This means that you need to “bar” the strings using your first finger.
This thick line is similar to other diagrams with a curved line. The curved line indicates the same thing: bar or flattens your index finger on all the strings.
But not barre chords stretch on all the six strings. In some diagrams, the bar is only on five strings (as indicated by a thick black line over the five strings) and an X on top of the final string. You will bar your index finger on the five strings and leave the low E open. Strumming starts from the fifth string or A.
The starting fret
With a barre chord, the number is located on the side of the diagram, and this number tells you what fret the diagram is. Compared to open chord diagrams, the top line of a barre chord does not mean the nut.
So if you spot a number, let’s say “5” on the diagram, you will place your fingers on the 5th fret on your guitar. If the number says “7” then you will start placing your fingers on the 7th chord. Take note that the shape of the chord is similar to the 7th fret.
A beginner may find barre chords difficult to learn, but no doubt that these are very useful. Consider that the same chord shape may move up or down the fretboard makes new chords. This is how important barre chords are. Once you memorize the barre chord shape, you can play this on any section of the fretboard.
More tips when reading chord diagrams
You can’t expect to learn how to read chord diagrams right for the first time. Follow these tips so you can read chords quicker and easier.
Chords with different numbers
Oftentimes, you will see chords that have different numbers. This could be chords that you already know or chords from another source and then from another one.
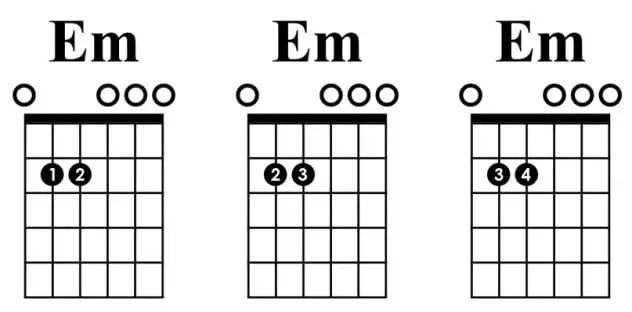
Looking at the image, these are variations of the Em chord. These are all for the same chord, but the numbers are very different. This is because there are some chords, like the E minor, maybe played with several finger combinations. Simply put, there is no right or wrong way to play Em, and any of these combinations will sound the same thing. You can use any of these finger combinations to play E minor.
Try playing all three combinations and see which one is more comfortable for you. You will also notice this on other guitar chords, and thus you will be able to adjust your finger techniques to suit your comfort. Also, take note that the better and more comfortable you are in playing the chord, the better you’ll be able to move from one chord to another. So the numbers on the diagram are just suggestions; if you can think of a better finger placement that’s more comfortable and accessible for you, then it’s okay.
Chords with a questionable X
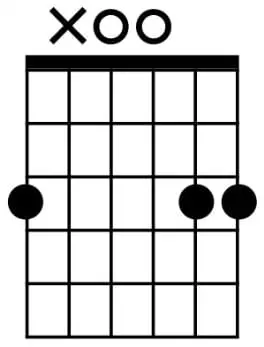
In the diagram, the low E string is played, the A string is skipped, and all the other strings are strummed. How will you be able to do this? To play this chord, use your finger to mute A. This will allow you to strum all the six strings as the 5th will remain muted.
If you’re starting to learn how to read and play guitar chord diagrams, and you come across this kind of diagram with an X on the middle string, simply think of a finger to use to reach and mute the string.
Having flexible fingers is a plus for guitar players. Most guitar players can stretch their reach and play any chord instantly and seamlessly because of constant practice. You can also develop this kind of reach when you practice daily.
Using a capo
A capo is a device that you use to mute guitar strings. With a capo, you don’t have to strain your fingers, and you can move freely up and down the fretboard. The chord shape stays the same, but a capo will change the chord that you are playing.
For instance, when you play E, the chord shape E = E Major, and a capo on the 3rd fret, the chord becomes a G Major. Understanding music theory will help you understand what this means. But you don’t have to worry since the chords stay in the same position, and only the name of the chords change with a capo.
And when you find a chord with a capo, read the diagrams so that the thick line will match the capo instead of the nut.
Vertical lines on chord diagrams
All chord diagrams come with vertical lines. These lines are strings on the guitar. The strings on the farthest left line are the low E string of the guitar. Meanwhile, the far-right line is the high E string on your guitar.
Horizontal lines on the chord diagrams
Horizontal lines are the frets of the guitar. In regular chords, the top line is the guitar nut. In barre chords, the top line can be any fret on the fretboard. You can easily identify that the chord is a barre chord if there is a thick black line across the strings or a long curved line on top. The two symbols mean one thing: you must mute the strings that are under the line.
Numbers and black dots
The numbers on the chord diagrams can mean a different thing. In regular chords, numbers refer to the different fingers with the index finger as 1, the middle as 2, the ring finger as 3. And the pinkie finger as four. The thumb is the letter T, but it is uncommon to use the thumb in guitar finger diagrams.
Numbers on a barre chord are found on the left side of the chord diagram. These numbers indicate the fret number. If you spot a 7 near the diagram, it means to play the chord on the 7th fret.
The black dots that you see on the chord diagrams indicate where you will place your fingers. You will place your fingers along the frets and the strings which match the ones that you see on the guitar chord diagram. Meanwhile, the numbers will tell you which finger to use.
Number of strings to strum
A diagram will also tell you how many strings to strum in a chord. An O on top of the string indicates that you play the string or strings while an X tells you not to touch the string or strings. Take note that every chord is different; you must look at the chord diagrams well to find out which string should you strum.
Which chords to learn first?
Now there are so many chords to learn, but we suggest learning the basics by heart. The simplest chords are Em, Am, G, D, C, and E. These chords are used in many songs and are easy to learn right away. After learning these basic chords, you can now immediately proceed with learning the chords associated with these major chords.
Then, after learning how to read chord diagrams, it’s time to learn about guitar TABs. Once you know how guitar TABs are read, you will be able to play any kind of song you want.
What is the guitar TAB?

Guitar TABs are short of tablature, and it’s where you’ll find all the chords and chord symbols you’ve learned earlier. There are different kinds of TABs, but all have the same format. The previous image is an example of a very common text-based tab that’s very popular online. The very first guitar TAB sites continue to use this format, and thus it’s considered one of the basic types.
Some tabs have different symbols, and these symbols tell you a lot about how to play the song. The problem with simple TABs is that these don’t have any details on the song’s rhythm. Other guitar TAB types have rhythm notation. This is the reason why we prefer that you use other types of TABs than text-based tabs.
There are so many websites that provide guitar TABs for many songs, but we recommend you use Songsterr. This site has an interactive type of TAB which looks slightly different from text-based TABs. These TABs have more information than text-based TABs
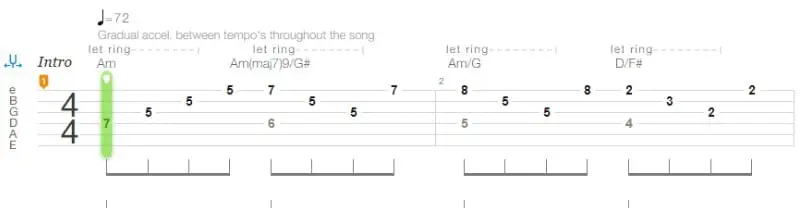
Meanwhile, formal guitar tabs are much better, and you’ll likely find this format when you’re playing from a TAB book or a music book.
Looking at this formal guitar TAB, there is two staff that are connected. The top staff is in Standard Notation while the bottom one is in TAB or tablature. This kind of TAB gives you two tabs in one, and it provides the most info to play a song. But if you don’t know how to read Standard Notation, you can ignore the top part and just read the guitar TAB at the bottom.
Layout
A guitar TAB comes with six horizontal lines that represent the six guitar strings. Meanwhile, other string instruments may have more or less number of horizontal lines. For example, TABs for ukuleles and bass guitars only have five or four lines.
TAB for a guitar with seven strings will have seven horizontal lines. In text-based TAB, from the thickest to the thinnest string, is E-A-D-G-B-e. Therefore the top line on the TAB is the highest pitched-string on the instrument, and the lowest line is the lowest pitched-string.
The numbers on the guitar TAB
Each line is a string on the guitar; if there is a number on a line on the TAB, this means that you must play the specific note on the string.
Numbers on the TAB are the fret number on the string. The number 5 is the 5th fret, and 12 would be the 12th fret. 0 is an open string or no fret. There are two numbers on a guitar TAB.
The numbers that are written on top of each other means that you must play the numbers at the same time. This means that you must strum the chord. Take a look at the two images:
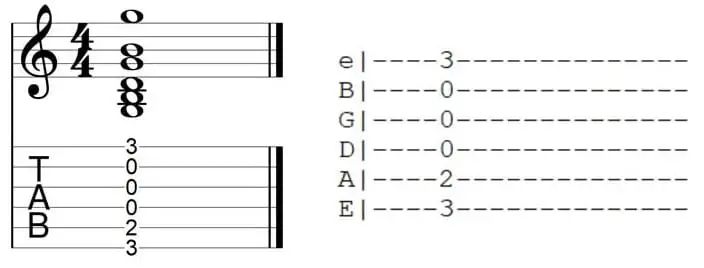
If you play all the numbers this way, you will play a chord.
Meanwhile, numbers that are placed left to right or side by side, the TAB is telling you to play the notes one after another, starting from the left going to the right. You will only play a string when you see any number on the string. No number = do not play the string.
The symbols on a guitar TAB
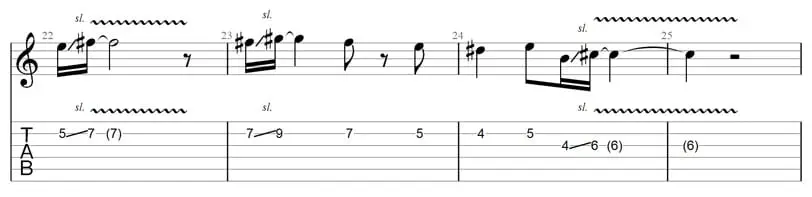
When you see symbols on a guitar TAB, these means that you need to perform the particular technique. Most symbols represent techniques like bends, slides, palm-muting, hammer-ons, and many more. The following are common symbols in a guitar TAB.
H is for “hammer-on” and this is telling you to play a note and to hammer on to a higher note. In text-based TABs, the h is in-between notes while in formal TABs, the capital H is over the notes.
P or p is “pull off” and this symbol tells you to play a particular note and pull off on a lower note. A pull-on is the opposite of a hammer on. When hammer-ons and pull-offs are combined, a legato is formed.
You will also find symbols like / and \. These symbols tell you whether you must slide up or down a note. If the slash moves downward or \, then you need to slide down, and when it moves upward like / then you must slide up. In some TABs, the / and \ are replaced with the letter s.
B or b means to bend. In formal TAB, a curved line with an arrow is used to represent bend while in text-based TABs, the letter b is used. Other symbols are PM for palm muting, “` is for vibrato, x as a muted hit, <> is for natural harmonics, () for grace note and t for tapping.