
Whether you’re an experienced or novice guitar player, you need to learn and master the art of changing the broken strings of your instrument. It is simple and quick to do. You can do it right with just 7 seven steps.
The Importance of Changing Your Guitar Strings
A guitar string may get worn in the long run. Therefore, it is so important to replace it as soon as you find it necessary. Preferably, replacing the string of your guitar once every month is advisable.
If you are actively playing, you should change it once every two weeks. Even the brand-new guitar needs new strings after 30 days from the day it arrives at your doorstep.
With new strings, your guitar will sound better, so you will have more fun each time you play with your guitar.
Choosing the Right Strings for Your Guitar

Here are some vital factors to consider when choosing the perfect strings for your guitar:
#1. String Brands
Pick a brand of string based on your taste. Try out various brands so that you can easily find out the best suitable brand for your guitar.
#2. Composition
Consider the construction and material used for the strings you’re planning to buy. In many cases, manufacturers produce strings by winding the wrap wire around a metal or steel hex-core wire.
The material used in making a wrapped wire will determine the sound of a guitar string. Nylon, nickel, stainless steel, and phosphor bronze are also common materials used in making guitar strings.
#3. String Gauge
This is the string’s diameter. Take note that the guitar strings are available in sets. Typically, the makers classify the sets based on the first or last string’s diameter. Values such as .009 will be the diameter gauged in inches.
Those guitarists who play jazz music played on the heavy sets ranging from .012 to .054 as they are more sustainable and produce a thicker and louder tone. The only problem with the heavier sets, however, is that they are more difficult to bend and push down to fretboard.
For novices, they must settle for the lighter set instead because it is easier to carry and doesn’t cause pain on fingers.
Note: when changing a string set along with another gauge, you need to readjust both the guitar’s intonation and neck. Heavier guitar strings create more tension. Hence, it pulls more relief in your guitar’s neck.
#4. Type of Winding
It comes in two forms: round wound and flat wound. The round wound uses round wires. This kind of winding will give a brighter sound but will produce extra noise.
The flat wound, however, is using a flat ribbon cable. It will provide the guitar strings with reduced resistance and less noise due to their smoother surface, but they will produce a dull sound.
7 Steps in Stringing Your Guitar
Don’t know how to replace the broken strings of your guitar? Don’t fret. Now, you can do it on your own with these seven simple steps:
Step #1. Prepare the Needed Materials
Get one pack of premium guitar strings. Don’t just buy a pack of strings. Think of the kind of guitar you have. If your guitar is acoustic, then you should buy acoustic guitar strings. If it’s electric, then go for electric guitar strings.
Guitar strings come in various measurements, too. These measurements indicate the thickness of the strings. Thicker guitar strings produce fuller sounds, but there could be string tension as well. It makes these strings a little harder to play.
Aside from the guitar strings, you should also prepare a string winder, strings, and wire cutters.
Step #2. Loosen the Old Guitar Strings
Once the needed materials are ready, start loosening the strings on your guitar. When you strung them, you must turn the tuners for bass strings. They are the three biggest and closest guitar strings to you.’
Also, you should turn the treble strings. They are the three slimmer strings positioned far from you. Turn all these strings in the right direction for loosening them.
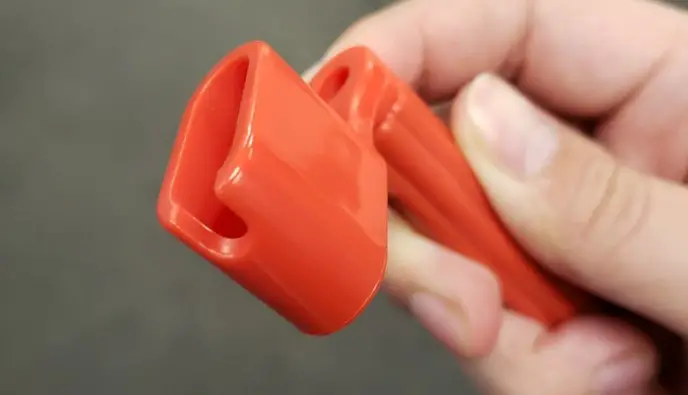
If the guitar strings are already broken, you can use a string winder instead. This tool often comes as a freebie in the package when you buy a new guitar. A string winder is so affordable as it costs less than $1, depending on the brand. You need this, especially if you often got broken strings.
Use a string winder to remove a broken string. You can also do it with your bare hand. Be sure the guitar strings are loose enough that they no longer produce a sound.
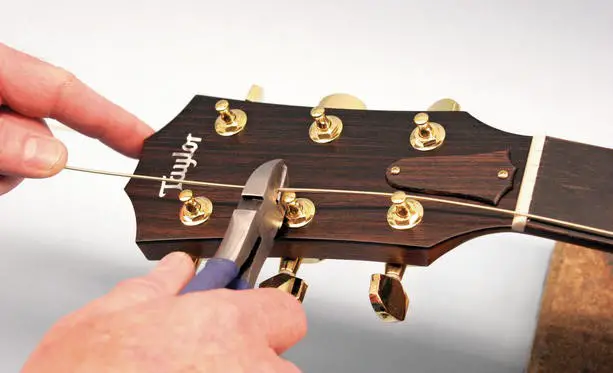
Step #3. Cut the Guitar Strings
Get your wire cutter and start cutting the loose strings all over the soundhole.
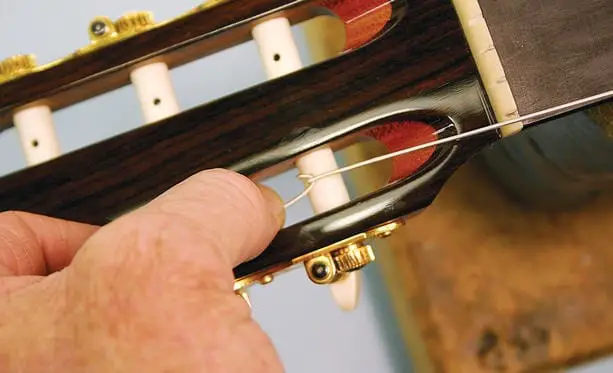
Step #4. Remove the Guitar Strings
If you have an electric guitar, you must pull the guitar strings out of the saddles. If it is an acoustic guitar, then you should first remove the guitar bridge pins.
Usually, the string winders feature a notch that captures and holds the pins. This notch helps a lot in pulling the string winders.
If you remove the string’s ball-end, you need to unwind the opposite side of the guitar strings thoroughly. This part attaches to the headstock. Be extra careful when you unwind because the end of guitar strings can be too sharp.
After removing all the strings, gather and tie them up, forming a circle. This will help lessen the chance for them to poke you. You can also try recycling the used guitar strings.
Step #5. Identify the Guitar Strings
If it is your first time to restring your guitar, then keep in mind that manufacturers label every strip in the set by its gauge. The ball of every string will be in different colors that will tell you the gauge of your guitar strings.
Check the package of guitar strings and look for the explanation of these colors.
By opening the box set, you will see the wrapped strings and the gauge printed on a sleeve of the packaging. The higher the digit, the thicker the guitar string. This will serve as your guide in putting each string to your guitar.
The one with the largest gauge is your low E guitar string. The other with the smallest measurement will be your high E guitar string.
Step #6. Thread the Guitar Strings
Begin with stringing your low E guitar string. Next to it are the A and D strings. Do the same for the rest of the guitar strings.
Winding the guitar string is quite easy to do when threading it over your tuning peg. You can also wind the guitar string to wrap itself under the string’s initial part. You can also use the string winder that will make the job much easier.
Step #7. Stretch the Guitar Strings and Tune Them
Now, you can start tuning every string. Feel free to play. However, bear in mind that new guitar strings require some time for stretching. This way, you can gently tug at your guitar strings to hasten the process.
If you do not stretch the new strings of your guitar, they will likely lose the right tune right away after a few times of playing. Hence, you need to slightly stretch these strings before they can settle.
This is it! You have successfully replaced the old strings of your guitar.
Tips in Stringing Your Guitar
Here are some tips that will help you restring your guitar the easiest way:
#1. Clean the guitar, including the fretboard before you replace the strings.
Commercial string cleaners do not damage your guitar’s timbre. However, wood polishes may negatively affect your guitar strings. When you choose to clean your guitar thoroughly and like to use timber oils or polishers for your fretboard, then do it first before restringing your guitar.
If you ever think one of these materials can harm the strings’ quality and integrity, clean the guitar first while the used strings are still on. You can also do it even without the guitar strings.
#2. Replace the guitar strings one by one.
You might be aware of it already, but most guitars have a device known as the truss rod. This device is running along the neck of your guitar. It counteracts the tension caused by the six tightened guitar strings.
Removing the guitar strings means there’s no pressure to offset. Therefore, a truss rod can be strong enough to bend the neck of your guitar.
In replacing guitar strings, be sure you do it with sincerity. It is a sensitive matter that once you do it incorrectly, you may fail to get things back to normal. To prevent this, try to change the strings one by one.
Replacing the strings one at a time can be time-consuming. However, it helps to maintain the status quo of the string pressure against the truss rod.
Also, when you replace the strings one by one, you can easily tune the replacement to the concert pitch by making the used string as your reference.
#3. Stick with a similar measurement of your strings
When you have chosen a perfect string gauge or thickness, it is best to stay with it to get rid of the possible problems that a truss rod may cause. Putting a heavier or thicker string will need more pull on your guitar’s neck and elevate the action.
A slimmer or lighter gauge, however, may cause a problem involving the truss rod and lower the action, causing the strings to rattle against your fret cables.
So, be careful when choosing a string for your guitar. Do not forget to consider the different materials and kinds as they will provide you with another sound. Just follow the standards when changing the strings unless you know how to tweak the setup of your instrument.
Also, if you want a different string gauge instead of the default one, then be sure to ask for assistance from the store personnel for checking the truss rod pressure.
#4. Don’t forget to clean the guitar strings.
Make it a habit. Remember, your fingers will secrete all types of acids and oils. Also, you tend to hold corrosive materials in most cases. All these things can quickly stick into the strings of your guitar that makes them weak and sound dull.
Also, these things will make your guitar strings look old sooner than you think. A string cleaner can be a great solution to your problem. If you do not have one, you can wipe down the strings using a near fabric after each play. This will even extend the lifespan of your life.
Likewise, in some cases, string cleaners protect the material against corrosion. Thus, if you’re fond of leaving your instrument somewhere within your reach, then you should have a string cleaner.
Aside from washing your hands and wiping down the strings, you must keep the fretboard oiled and clean. All of these simple things will help to extend the lifespan of your guitar.
#5. Practice proper changing of the guitar strings
When you break more guitar strings, find the sharp edges along the bridge, tuning pegs, or saddle. Sometimes, the strings get stuck within the nut slot, which usually happens when you tune them down.
Fix the problem by putting some flake graphite inside the nut slot or underneath the strings to eliminate friction, allowing the strings to glide freely. You can get some flake graphite through scratching the pencil lead by using a knife.
Also, be sure to change the used strings only when they lost their intonation and brilliance. The longevity of these strings depends a lot on your guitaring habit. The more often you play, the less time your strings will last.
Moreover, do not try to replace just the broken string. If you do, it may ruin the tune of your guitar in general. That’s because the sound of a new guitar string is different from the used strings.